Today I Learned
20210627 Quizzler project -3
돌맹이시터
2021. 6. 27. 23:52
어플 사용자가 선택한 정답과 실제 정답을 비교해서 print되도록 코드를 작성했었는데,
정답 / 오답 여부에 따라 버튼의 backgroundcolor가 달라지도록 수정할 것이다.
if userAnswer == actualAnswer 문의 코드블럭만 수정한다면,
다음 질문으로 넘어갔을 때도 변경된 backgroundColor으로 유지되기 때문에
다음 질문으로 넘어갈 때 backgroundColor가 다시 clear로 변경될 수 있도록
func updateUI() 부분의 코드도 수정했다.
두 가지의 방법으로 코드를 작성해보았다.
1. DispatchQueue 사용
	if userAnswer == actualAnswer {
            // UIcolor == 미리 build되어 있는 color
            sender.backgroundColor = UIColor.green
        } else {
            sender.backgroundColor = UIColor.red
        }
        if questionNumber < quiz.count - 1 {
            questionNumber += 1
        } else {
            questionNumber = 0
        }
        updateUI()
    }

    func updateUI() {
        questionLabel.text = quiz[questionNumber].text
        DispatchQueue.main.asyncAfter(deadline: .now()+2.0) {
            self.trueButton.backgroundColor = UIColor.clear
            self.falseButton.backgroundColor = UIColor.clear
        }
    }
if username~부분과 func updateUI() 부분을 수정했는데,
updateUI 코드블럭에서 DispatchQueue를 사용하지 않고 true/falseButton을 수정하는 경우,
if 문에서 정답여부에 따라 버튼의 색이 달라지는 부분이 무시되기(?) 때문에
DispatchQueue. ~ 코드를 사용해서 딜레이를 줬다.
2. Timer 사용 (egg timer 어플에서 사용했던 방법)
if userAnswer == actualAnswer {
// UIcolor == 미리 build되어 있는 color
sender.backgroundColor = UIColor.green
} else {
sender.backgroundColor = UIColor.red
}
if questionNumber < quiz.count - 1 {
questionNumber += 1
} else {
questionNumber = 0
}
Timer.scheduledTimer(timeInterval: 1.0, target: self, selector: #selector(updateUI), userInfo: nil, repeats: false)
}
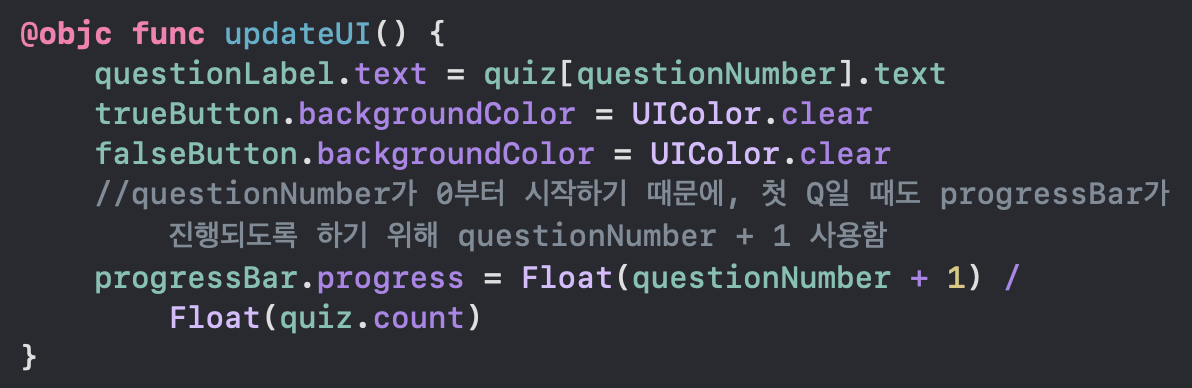
@objc func updateUI() {
questionLabel.text = quiz[questionNumber].text
trueButton.backgroundColor = UIColor.clear
falseButton.backgroundColor = UIColor.clear
}
Challenge )
progressBar를 현재 퀴즈의 진행상황에 맞게 조절되도록 코드를 추가할 것 (한 줄)